- Computers are NOT needed for lab this week
- A quick lab – students will start leaving by 2:00 pm!
- Turn off H-bulb when not in use! It will extend the lifetime of the bulb
- The H-bulb can take a moment to turn on (a few seconds to a minute or two), especially if it hasn't been used in awhile
- Turn the Na light sources on at the beginning lab. They need a while to warm up. Don't turn them off until everyone is finished
- I've added labels (A - H) to each spectrometer. There seems to be a slight difference in the calibration of each, so it's important that students record which spectrometer they used
- When showing students the operation of the spectrometer, tell them to push on the angle gauge pointer only, not the eyepiece. The eyepiece moves easily, so it's easy to change the focus and alignment of the cross-hair (adjustment settings below)
- Tip: Press down on spectrometer base with the fingers of one hand while moving telescope with the other
- Demo on side of lab (Optional - may not be set up if they've seen this in class or if Jeff is too damn lazy to do it):
- Have each student grab a 2×2 grating, and look at the Hydrogen, Helium and Neon spectra, in turn
- Two incandescent bulbs: Standard on the left (continuous spectrum), and a GE Reveal™ bulb on right (absorption spectrum). Have students walk in a line from right to left, looking through the grating at the slit aperture in each so they can compare the two spectra. The Reveal™ bulb shows a continuous spectrum with two absorption lines in the yellow region
- How does the Reveal™ bulb work? From the box: "Reveal's unique neodymium glass filters out dull, yellow rays unlike regular soft white bulbs, leaving you with enhanced, vivid surroundings." So, the blue glass absorbs yellow wavelengths
- Students get confused about which three lines of hydrogen they are observing. They also want to put the yellow sodium line on the energy level diagram. Here are the actual angles and wavelengths (calculated from energy level diagram):
| Color |
Name |
Angle (°) |
λ (nm) |
| Red |
Hα |
23.7 |
656.0 |
| Blue-Green |
Hβ |
17.5 |
485.9 |
| Violet |
Hγ |
15.5 |
433.9 |
| Violet |
Hδ |
Not observed |
410.0 |
|
| Yellow |
Na |
21.5 |
589.3 |
- These are crappy spectrometers, yet they still produce excellent results! Most students will get wavelengths with less that a 1% difference
- Small pieces of cardboard may have been placed between the wood platform and bench, or between wood platform and spectrometer to keep it from rocking
- Procedure change, Spring 2024: Over the past few centuries, we've asked students to calculate the wavelength of each spectral line of hydrogen since we know the ratio of wavelength to angle is the same for all lines observed in hydrogen and sodium. This procedure is the result of the previous spectrometers we used for this experiment (see Historical Note below). The problem has always been that students don't understand ratio, so it has always been a meaningless exercise. It's generally the last experiment of the semester, and I've always been too lazy to do anything about it. I finally changed the experiment so that students calculate the value of d for their spectrometer based on their measured wavelength of the yellow line of sodium (we give them the wavelength of the sodium line). Then then use their d and the grating equation to calculate the wavelength of each hydrogen line, and the results this semester were excellent. The difficulty is that there is a slight difference in the calibration of each spectrometer, due to the inconsistency of the crappy gratings that are used, or the fact that there are alignment issues with each one. You can check my calibration notes, comparing the results of the Spring 2024 semester to my measurements of each. It's important to check each group's value of d against my measurement for a given spectrometer. If they're within 2% or so of my measurement, they'll get excellent results (% differences of 0.5% or lower, assuming they don't screw up a measurement the angle of a hydrogen line). Here's a summary of my values of d for each spectrometer:
- Using the results from just my measurements, I get d = 1640.1±30.7 nm (within 2σ), which gives a range of values of 1609.4 ≤ d ≤ 1670.8 nm
-
Spectrometer Calibration (Spring 2024)
| Spectrometer |
My Average θNa (°) |
My d (nm) |
| A |
21.1 |
1640.7 |
| B |
21.4 |
1618.7 |
| C |
20.9 |
1655.7 |
| D |
21.2 |
1633.3 |
| E |
21.1 |
1640.7 |
| F |
21.3 |
1620.5 |
| G |
20.9 |
1651.9 |
| H |
20.8 |
1659.5 |
- Historical note: The current crappy spectrometers we use cost $400 each and are made of particle board and cardboard. They are no longer manufactured - no surprise there. The previous ones we used were built on a heavy wood base, but the angle was not measured directly. There was a notch at the base of the telescope where you would mark the position of each spectral line on a piece of paper. You would then connect corresponding notches with a line, measure the length of each line, and calculate the wavelength by using the ratio of the wavelength to the length of each drawn line (knowing the wavelength of sodium). Incidentally, you could easily observe the Hδ line of hydrogen with those old spectrometers!
 The spectrometers are aligned before lab, but they are easy to bump out of alignment before use. Procedure to quickly get back on track:
- With the slit-end of the stationary tube facing hydrogen source, swing the telescope completely to one side and look through the diffraction grating. The stationary tube will easily rotate in its holder, so rotate the tube so that the slit is parallel to the tube.
- Move the front of the spectrometer and wood platform left and right so the the image you see is at its brightest
- Move the telescope to its central position, and place the cloth over the gap between the telescope and stationary tube (to block out extraneous light.) Look through the eyepiece, and move the whole eyepiece in/out of the telescope to focus the image (it may or may not be very sharp.)
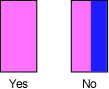
- Again move the front of the spectrometer base left and right so that the zeroth-order image is pink, without blue fringes:
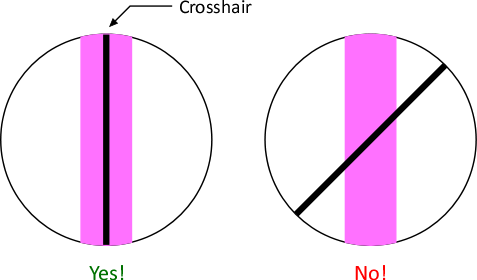
- Make sure that single cross hair
is parallel to the spectral lines on both the left and right side
of the zeroth-order image. Rotate the eyepiece diagonal left and right to align. The cross hair is glued to the eyepiece, so this is the only way to do the alignment:
- Quickly swing the telescope left and right to make sure you can see the spectral lines. Sometimes you might need to rotate the stationary tube a small amount so that the spectral lines are not cut off as viewed through the eyepiece. When finished, return the telescope to the zero position
- When students move their spectrometers to the sodium light, they might need help them aligning it with the sodium source. Point out to them that they are looking at the zeroth-order image of the bulb; they need to swing the telescope left and right to find the yellow line at 589.3 nm, and record the angle
- The yellow sodium line is between a faint green and faint red line; all three are visible through the eyepiece
- Many get confused thinking that they need to include the yellow sodium line on the energy level diagram!
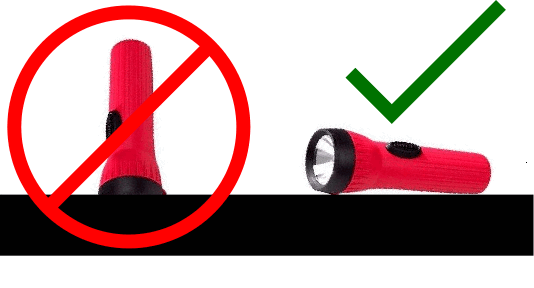
- When everyone is finished, tip over all the flashlights. Students will frequently leave them turned on and place them face-down on the bench, draining the batteries
|