MEASURING TEMPERATURE AND RESISTANCE:
In this lab we will measure the resistance as a function of temperature
for two samples, one will be an evaporated metal film and the other will
be a strand of gold wire.
The Temperature
The temperature will be measured using a silicon diode. A diode
is a semiconductor device which acts like a one-way current gate, allowing
a much larger current in one direction than the other. Being a semiconductor,
the density of charges in the diode is a function of temperature, so it
we put a constant current through it, the voltage across it will tell us
the temperature. We will use a temperature controller that can convert
that voltage into temperature for us, so that we can concentrate on more
interesting things.
The Resistance
Electrical resistance is one of the most commonly used diagnostics
for testing a material. This is because electrical measurements in
general tell something about how a material treats its electrons, which
in turn tells us something about the microscopic environment of the material.
Resistance measurement is a relatively cheap "atomic microscope."
You can think of resistance depending on three things--the dimensions
of the sample; the density of charge carriers (usually electrons); and
the mobility of those carriers (how free they are to move). We can
study how the resistance changes with energy by varying the temperature.
Since the dimensions of these materials won't change too much, we will
be observing how the other two properties change.
Resistance measurement can be done easily with a simple two-terminal
ohmmeter, which sends current through two wires and measures the voltage
between its two terminals. The problem with using such a device for
precision measurement is that one measures not only the resistance of the
object being studied, but also the resistance of the wires leading from
the object to the meter's terminals. For relatively large resistances,
this may be adequate, but for small resistances it is not sufficiently
precise.
A more accurate approach is the "four-terminal" technique. Attach
four wires to four points on an object to be studied. Send current
between two points and measure the voltage drop between the other two;
the resistance equals V/I. If no current flows through the voltage
leads, then the voltage measured is the voltage drop across the sample.
There is one more problem with precision resistance measurement of which
you need to be aware. If you send zero current through two wires
that are connected, you don't always get zero voltage: see the thermocouple
note at the end. To remove unwanted noise signals that may be comparable
to the signal to be measured, it is necessary to compare the voltage, V1,
across your sample when a current, I1, flows through it to the voltage,
V2, when either no current, I2, flows through it (I = 0) or the current
is reversed (I = -I). The resulting resistance measurement will eliminate
most unwanted noise:
R = (V2 - V1)(I2 - I1) .
Experiment:
WARNING: Be very careful to replace the lid on the liquid
nitrogen dewar when it is not in use. Not only will you limit the
boil-off of the liquid, but you will prevent the accumulation of ice and
the hazardous build-up of liquid oxygen in the tank. Oxygen has a
higher boiling point than nitrogen, and so it liquefies at a higher temperature
also. If a dewar of liquid nitrogen liquefies enough oxygen from
the surrounding air, the liquid oxygen will stay liquid even after the
nitrogen boils off. When the oxygen finally does boil off, this can
lead to a dangerous accumulation of oxygen gas, which could start a fire
or explosion. Also, liquid nitrogen can burn. Use appropriate safety measures.
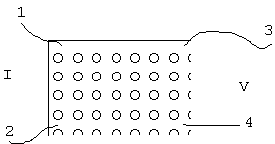
1. Sample attachment.
Determine which wire at the sample holder goes to which letter at the
connectors at the top of the rack. There is a set of four wires connected
to terminals R, D, C, and P, and another set of wires connected to K, U,
T, and J. Use an ohmmeter to dentify which are which. Next, choose four
wires that are handy, and connect them to your specimen as shown to the
right. Be sure to keep track of which wire is connected to which part of
the specimen.
Use some varnish and some string to secure your sample to the copper
sample holder.
2. Measurement of Resistance
Use a four-wire ohmmeter (Keithley 197) or a combination of a current
source (Lakeshore Cryogenics) and a voltmeter to make a four-wire resistance
measurement of your specimen. At room temperature, try all combinations:
current flowing between points 1 and 2, or 1 and 3, etc., and voltage measured
between the other to points. How many possible combinations are there?
Set up your wires so that current flows between two adjacent corners of
your specimen.
3. Varying the temperature
A cold finger cryostat can be used to cycle the sample through the
necessary temperature range (see diagram below). Measurements could
be made as the sample is cooling. Measurements should be made again
as the sample warms up. In order to cool the sample, the cold finger
must be clamped into the cryostat. Then a mechanical pump is used
to create a vacuum in the space around the sample. Liquid nitrogen is poured
into the top of the cold finger. The temperature should reach 90K
or lower.
There are two ways to warm the sample. One way is to use the heating
coil attached to the temperature controller. (If it is working.)
The other way is to allow the cryostat to warm by removing first removing
the liquid nitrogen (pour it out) allow the sample to warm up about 30
degrees. If it begins changing temperature too slowly, remove the
vacuum by opening the valve.
Start an open-ended data table in your notes to measure temperature
and the resistance of your specimen. If there are two thermometers working,
leave space for each.
Record the resistance of each sample as a function of temperature, between
the lowest temperature you can reach and room temperature, plotting your
results as you go along. When you are finished with a sample, you
may want to try dunking it in liquid nitrogen to get some data points that
go as low as 77 Kelvin.

Another way to get below 77K is to pump on the liquid nitrogen level
of the cryostat. Your instructor will show you how to do this.
The Report:
Your report should include the following information.
1. Graphs of temperature and resistance for both samples.
2. Find the room-temperature resistivity of the material you deposited.
From this information, calculate the thickness of your films.
3. Using the dimensions of your gold wire, calculate the resistivity
and compare it to the accepted value.
Thermocouple note: Using a thermocouple is another way to determine
temperature. A thermocouple is a junction of two dissimilar metal
wires across which a voltage develops if the junction is at a temperature
other than room temperature. Thermocouples are frequently used to
measure temperatures in relatively inaccessible environments, such as in
a dewar of liquid nitrogen (T = 77 K), or to measure temperatures that
are changing relatively rapidly. By measuring the voltage that develops
across the junction as a result of the temperature differential, we have
an accurate determination of the temperature at the junction.