Although colors can be modeled in a variety of ways, our Java classes use the RGB model which represents a color by encoding the amount of red, green, and blue present in that color. In particular, we will use 3 bytes to represent a color: one each for red, green and blue.
import java.awt.Color;
You won't see anything happen but now you're ready to create some colors.
Color c = ColorChooser.pickAColor();
The color corresponding to the selected combination of RGB is displayed in the Preview panel at the bottom of the window.
| RGB Combination | Color Description |
|---|---|
| Red = 255, Green = 0, Blue = 0 | |
| Red = 0, Green = 255, Blue = 0 | |
| Red = 0, Green = 0, Blue = 255 | |
| Red = 255, Green = 255, Blue = 0 | |
| Red = 255, Green = 0, Blue = 255 | |
| Red = 0, Green = 255, Blue = 255 | |
| Red = 0, Green = 0, Blue = 0 | |
| Red = 255, Green = 255, Blue = 255 | |
| Red = 100, Green = 100, Blue = 100 |
c you declared in step 5.
System.out.println
statement to display the value of c . What is the result?
Images are digitized into many tiny dots called pixels. Each pixel has a location in the picture and an RGB color.
A picture is composed of a
rectangular matrix of pixels. It
has two dimensions: a width and a height.
The location of a pixel
is identified by two numbers x
and y , where x is the
horizontal position in the matrix and y is the
vertical position.
The color of each pixel is represented by three bytes in the RGB model.
String fileName = FileChooser.pickAFile();
In the file selection window that appears go to
T:\Harcourt\Spring2008\CS140\gallery\national_geographic\scarletmacaw.jpg
And click on the Open button at the bottom of the window.
Use System.out.println to print the value of fileName.
What is it?
 Picture
	object by passing  fileName  to the constructor of
	the  Picture  class:
       Picture p = new Picture(fileName);


	  Print out the value of  p  using a
	   println  command.  What are the dimensions
	  (length and width) of the picture?
p.show()
and p.explore().
p.show(); simply displays the picture while
p.explore(); allows you to zoom
and select pixels to inspect their color.
p.show(); in the interactions pane now.
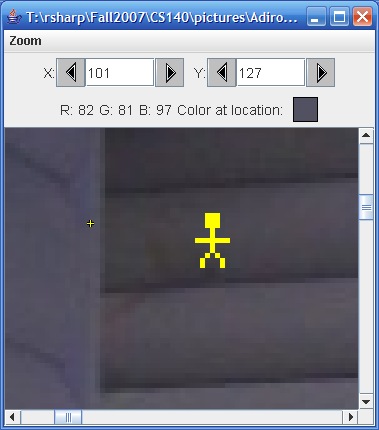
Close the window and now p.explore(); in the interactions pane.You should be able to click anyplace in the image and a little yellow cross will appear to show which pixel you selected. Above the image the values of the RGB components will be displayed. You can also manually type in the x and y coordinates to go to a specific pixel.
| Pixel Location | Red | Green | Blue |
|---|---|---|---|
| x = 10, y = 10 | |||
| x = 415, y = 405 | |||
| x = 225, y = 240 | |||
| x = 28, y = 521 |
| Pixel | X | Y |
|---|---|---|
| the top left pixel in the picture | ||
| top right pixel | ||
| bottom left pixel | ||
| bottom right |
We know that images are large matrices of pixels, each identified
by their (x,y) position in the matrix. The Java classes from the
book provide a Pixel class which stores information about the color and
location of a particular pixel from the original image.
Although you can create individual pixel objects independently of any
particular image, you will usually make references to them by pulling
them out of an already established Picture.
Pixel pixelObject = p.getPixel(120,150);
Print out the value of pixelObject using
a println statement. What is displayed?
Pixel objects know not
only their (x,y) position in the picture, but also their color. You can get the color
of a pixel object by accessing its Color object. There
are two methods for doing this:
Color object inside the pixel to
view or change it you need to make sure you have imported the Java package
java.awt.Color . We did this earlier, but to be sure, you can type this in the
interpreter again:
import java.awt.Color;
If you're writing a Java program and you need to import a Java package,
include the above import line at the very top of
the file before your class definition.
To get the entire Color object out of the pixel, use the following statement:
Color colorObj = pixelObject.getColor();
What is displayed when you print out the value of colorObj
Color object
from a pixel and call methods on it without making an
intermediate object reference. Try the following:
              System.out.println(colorObj);
              System.out.println(pixelObject.getColor());
What is the difference between the outputs of these two statements?
Pixel
object you can pass it a Color object
with a different color. There are several methods you can use to do this.
Color object and manually choose each level
of color you'd like. Try this:
Color myNewColor = new Color(0,0,255);
This line creates a new Color object.
You can now use it to change the color of a pixel on your image:
p.getPixel(451,377).setColor(myNewColor);
Run the command p.repaint(); and see if you can
see the changed pixel. What color is it? Use the explore method
to examine the color at position (451,377).
p.getPixel(124,125).setColor(ColorChooser.pickAColor());
And pick a color you think will stand out on the image.
Again, run the command:
p.repaint();
Did you see your new pixel?
Color class. These include:
Color.black Color.yellow Color.blue Color.green Color.red Color.gray Color.orange Color.pink Color.cyan Color.magenta Color.white
Notice these are not methods since they don't end in (). Instead,
these are members (members are like constant values 1, 2, ... or variables) of
the Color class and can be accessed directly.
Try executing this command:
p.getPixel(452,377).setColor(Color.yellow);
Follow it up with a:
p.repaint();
See if you can spot the three strangely colored pixels in your image.
Picture class's method write ,
like this:
p.write("myNewImage.jpg");
It's not always clear where the image was
saved on your file system. Technically, it's saved under
DrJava's "working directory" which is the directory where you
are currently editing a .java file in the definitions pane.
If you're not editing a .java file, DrJava remembers
the last place you did,
and uses that as your working directory.
The easiest thing to do in this step is to make a small program that opens
a file, edits it, and saves it. We'll place it in your P:\cs140 directory
thus forcing the working directory to be the same.
Copy the following class into the definitions pane (not the interactions pane!):
     import java.awt.Color;
     class SimplePictureEdit {
        public static void main(String[] args) {
          String fileName=
            "T:\\Harcourt\\Spring2008\\CS140\\gallery\\national_geographic\\scarletmacaw.jpg";
          Picture p = new Picture(fileName);

          p.getPixel(124,125).setColor(Color.yellow);
          p.getPixel(125,125).setColor(Color.yellow);
          p.getPixel(125,126).setColor(Color.yellow);
          p.explore();
          p.write("P:\\CS140\\myNewImage.jpg");
       }
     }
Save this program in your P:\cs140 directory and compile it.
When you run this class you should see a picture appear
on the screen, and it should save a
copy of that picture into P:\cs140\myNewImage.jpg .
Before you can be checked off today, you'll need to show your
instructor this file.
Edit your SimplePictureEdit class to draw a little
image. Here's a zoomed in example I did where I made a little
stick figure. Be creative and do something different, like an
intricate shape, a word, your name, etc.