Getting Started with the AP
Introduction to the Micron Development Tools
Kevin Angstadt
angstadt@umich.edu
University of Michigan
Introduction
This tutorial provides an introduction to the development tools provided by Micron Technology for the Automata Processor (AP). This is not meant to be a comprehensive overview of the tools. Rather, this should provide inquiring minds with a solid foundation for further inquiry and exploration.
The following topics will be covered in this tutorial:
- Acquiring the AP SDK
- Compiling Regular Expressions
- Getting Started with the Workbench
- Verifying and Optimizing Designs for the AP
- Programmatically Generating Automata
- Compiling Automata
Note: This tutorial assumes the use of Linux; however, the SDK also supports Windows operating systems.
Acquire and Install the Tools
The AP SDK is currently available by request at micronautomata.com.
-
Verify that your system will support the SDK. Requirements are given here.
-
Request the tools from micronautomata.com.
-
Once your request has been approved, download and install the SDK. Note that on Linux, there are several packages that must be installed to have the full set of SDK tools.
-
Register the SDK using the provided key using
sudo apsdk_activate.
Programming the AP
The Automata Processor executes non-deterministic finite automata (NFAs) directly in hardware using a DRAM array and a reconfigurable routing matrix. Consequently, programming the AP consists of specifying one or more NFAs to be executed.
There are three primary programming languages and associated programming models for the AP:
- Perl-Compatible Regular Expressions (PCRE)
- Automata Network Markup Language (ANML)
- RAPID
Compiling Regular Expressions
Another way to think about the AP is as a regular expression accelerator. Input is streamed to the AP, and the device checks the input against one or more regular expressions. Any matches are reported back to the host system.
The AP compiler provides direct support for compilation of PCRE. We will use update rules from Brill Tagging to understand the use of the compiler.
A single regular expression can be provided on the command line to the compiler.
apcompile -f single_regex.fsm "/ right/JJ to/[^\s]+ /"
Multiple regular expressions can be provided in a file to the compiler.
Each regular expression is provided on a separate line. Below is the
content of regex.txt.
/ right/JJ to/[^\s]+ /
/ the/[^\s]+ back/RB /
/ [^/]+/DT longer/[^\s]+ /
/ ,/[^\s]+ have/VB /
/ [^/]+/VBD by/[^\s]+ /
/ her/PRP\$ ,/[^\s]+ /
/ [^/]+/DT right/[^\s]+ /
/ [^/]+/IN 's/[^\s]+ /
/ [^/]+/RBS of/[^\s]+ /
/ had/[^\s]+ had/VBD /
apcompile -f multiple_regex.fsm regex.txt
The binary .fsm file generate by apcompile can be loaded
onto the AP and executed using the runtime API. This falls outside the scope
of the current tutorial.
Getting Started with the Workbench
The remainder of this tutorial will focus on ANML programming. ANML is a language based on XML for definite state machines. It is not recommended to program directly in ANML (at least initially!). For an introduction to ANML programming, this tutorial will begin by using APWorkbench, a graphical tool for laying out automata designs.
ANML: Basic Elements
STE
-
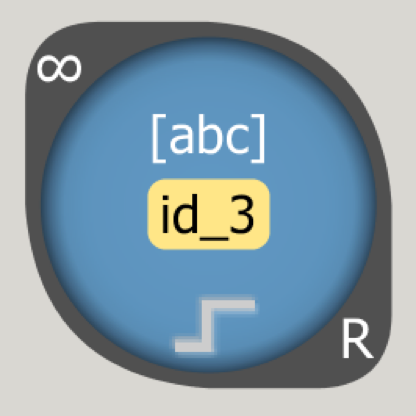
An STE accepts a given symbol set (character, PCRE character class, wildcard)
-
Each STE is identified by a unique ID
-
STEs can be active for the first input character, all input, or when activated by an incoming edge
-
A latched STE will, once activated, remain activated
-
An STE can report, triggering a report event on the AP, which is sent back to the host code
Counter

-
Simple thresholded up-counter
-
Has a threshold and a unique ID
-
Other elements can connect to count and reset ports
-
Can latch (output remains high), pulse (output once), or roll (reset) when the threshold is reached
-
Can report, triggering a report event on the AP
Boolean Logic
-
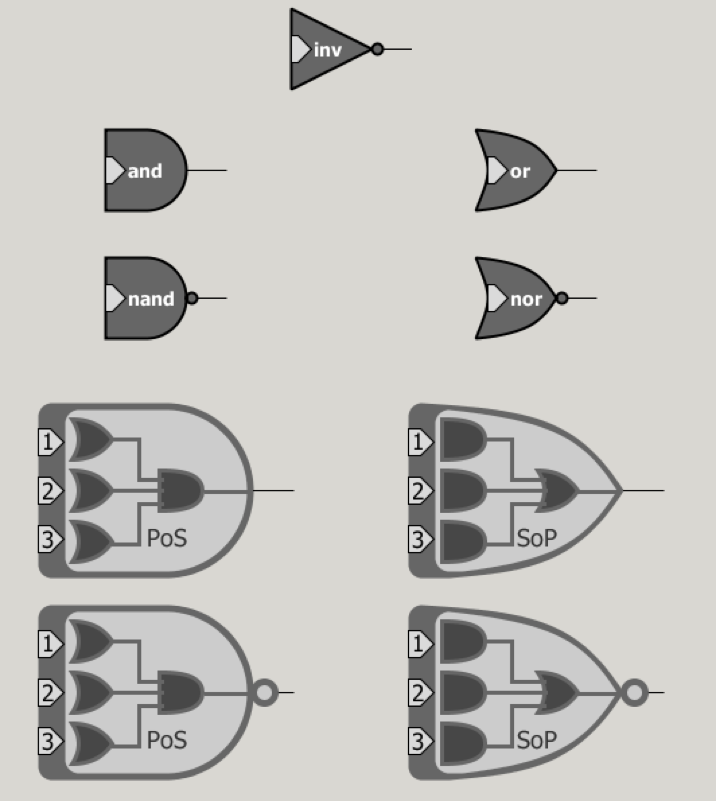
Combine activation signals
-
Inverter, AND, NAND, OR, NOR, PoS, NPoS, SoP, NSoP
-
Can report, triggering a report event on the AP
-
Can optionally activate only on EOD signal
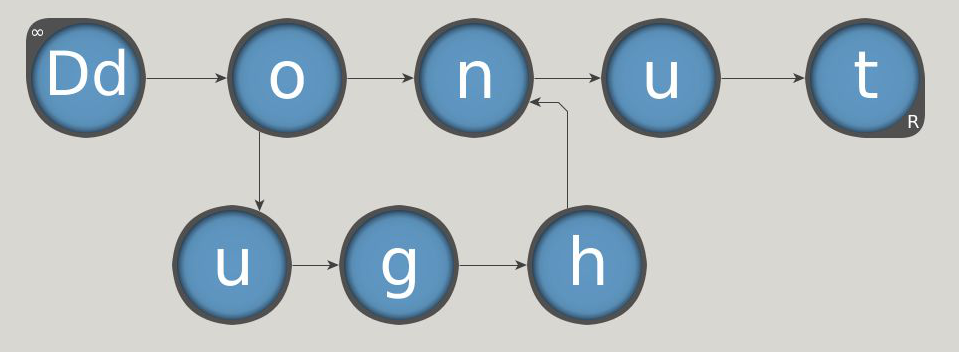
Example 1: Finding Do(ugh)nut
-
Open APWorkbench and create a new project
donut -
Drag out a total of eight (8) STEs from the palette on the right side of the window
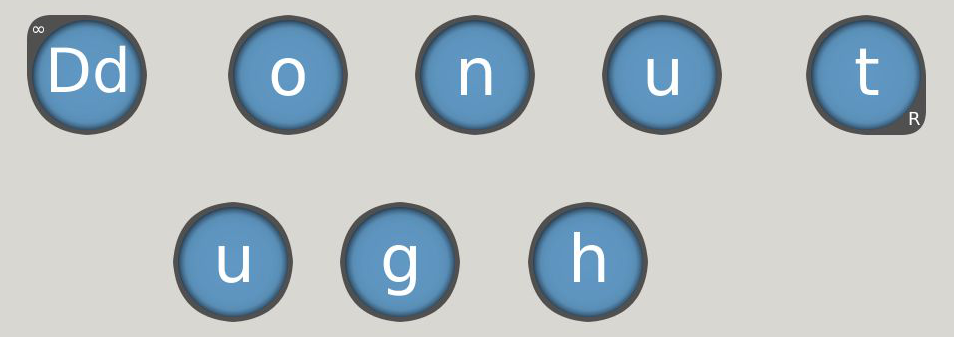
For the starting STE (Dd), choose Start: All Input
For the final STE (t), chick Reporting
-
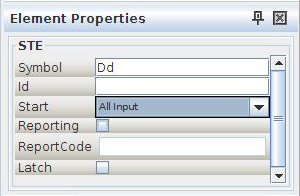
For each STE, set the symbol in the Element Properties pane on the right side of the window
-
Hover the mouse over an STE to create an edge.

-
Drag from the outgoing arrow to another state to create an edge
Simulation
-
Create
input.txtin the project directoryA doughnut or donut is a type of fried dough confectionery or dessert food. The doughnut is popular in many countries and prepared in various forms as a sweet snack that can be homemade or purchased in bakeries, supermarkets, food stalls, and franchised specialty outlets. Doughnuts are usually deep-fried from a flour dough, and typically either ring-shaped or without a hole, and often filled. Other types of batters can also be used, and various toppings and flavorings are used for different types, such as sugar, chocolate, or maple glazing. In addition to flour, doughnuts may also include such ingredients as water, leavening, eggs, milk, sugar, oil/shortening, natural flavors and/or artificial flavors.This text was adapted from Wikipedia
-
Choose
Simulation > Start Simulationfrom the menu bar -
Choose
input.txtas the symbol file -
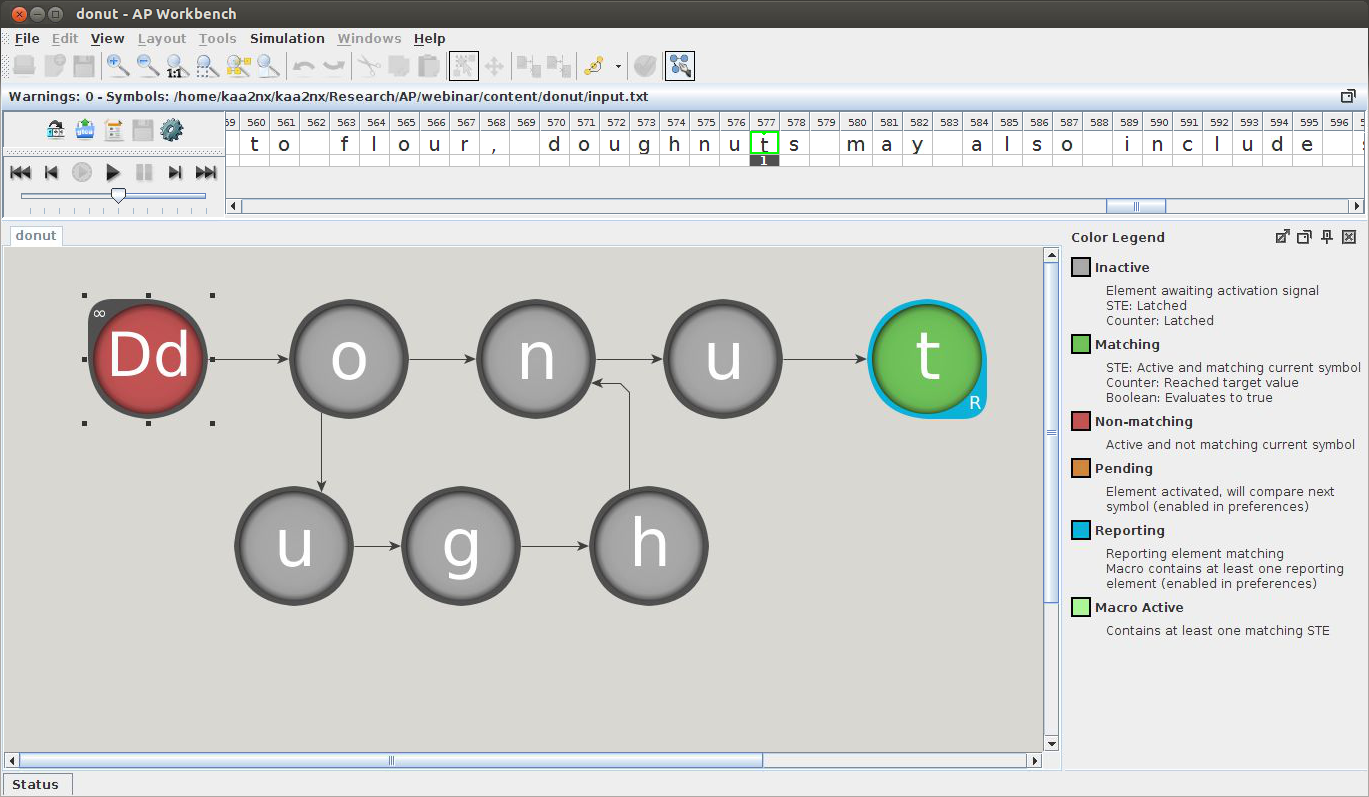
Use the playback controls to step through the simulation
-
Inactive states are grey
-
Matching states are green
-
Non-matching states are red
-
Reports show up as a number below symbols in the input stream
-
Double-click on a number above a symbol in the stream to jump to that symbol cycle
-
Example 2: Counting Do(ugh)nuts
Exporting ANML
As a first step, we are going to export ANML from example 1. This is a fairly common task for an AP developer (allowing for the design to be compiled).
-
With the
donutproject open, chooseFile > Export Project -
Save the file as
donut.anml
Working with Counters
-
Close the old project (small X next to palette)
-
Create a new project named
donut2-
Check the box for Initialize Project with ANML File
-
Choose
donunt.anmlfrom within thedonutproject directory
This imports the design from the previous project
-
-
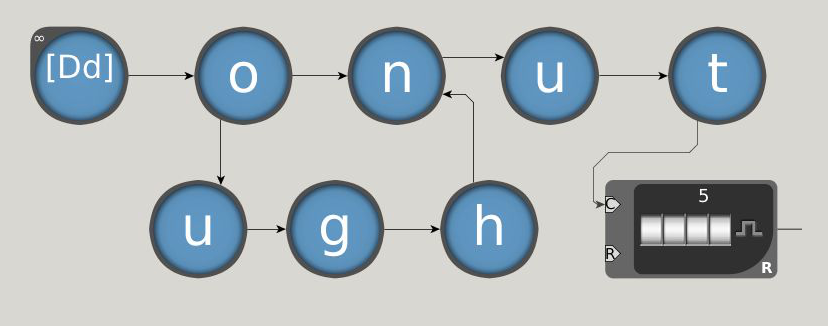
Disable reporting on the (t) state
-
Drag out a new counter from the palette
-
Set the counter target to 5 in the element properties pane
-
Enable reporting on the counter
-
-
Connect the (t) state to the (c) port on the counter
-
Create the same
input.txtas above and simulate -
The simulation will report on symbol 577 (indicating that we have seen five do[ugh]nuts)
Optimizing the Design
While reporting immediately when a pattern is matched may seem convenient, there can be implications when multiple patterns are being searched in parallel. Low cycles per report (CPR) will cause the processor to stall while reports are copied off of the AP.
It is therefore beneficial to stage reports and cause multiple patterns to report on the same clock cycle. Below is an optimization to the counting do(ugh)nuts example to demonstrate this.
-
Disable reporting on the counter
-
Change the counter mode to latch
-
Add an STE that matches on '\xFF' and reports
-
Connect the counter's output to the new STE
-
Add an \xFF character to the end of
input.txt
What is going on here? The counter will continuously output a signal
after counting five do(ugh)nuts. Whenever we want to check the count,
we inject an \xFF character. In this case, we do it at
the end of the input stream. This allows us to control when output
occurs.
Example 3: Boolean Operations
Let's see how boolean logic can help in our designs. We only wish to see a report if there are five do(ugh)nuts and an even number of characters in the input stream.
-
Create a new project
donut3and import ANML fromdonut2 -
Disable reporting on the STE after the counter
-
Add two '*' STEs
-
One should be set to start on "Start of Data"
-
-
Connect these STEs in both directions
-
Drag an AND gate from the palette
-
Connect the non-starting '*' STE and the '\xFF' STE to the AND gate
-
Set the AND gate to report
-
Simulate this against
input.txtfromdonut2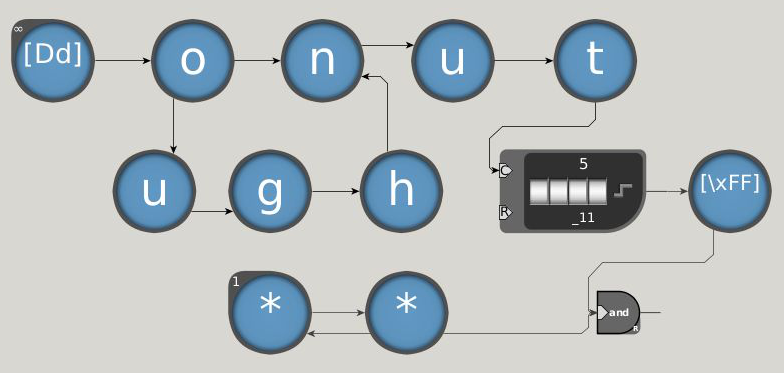
Example 4: Macros
Macros allow for the reuse of a design. They can be thought of as rubber stamps that save the developer time and abstract away design details.
In this example, we will create a Hamming distance macro by hand.
-
Create a new project named
macro_example -
Choose
File > New Macro -
Name the macro
Hamming -
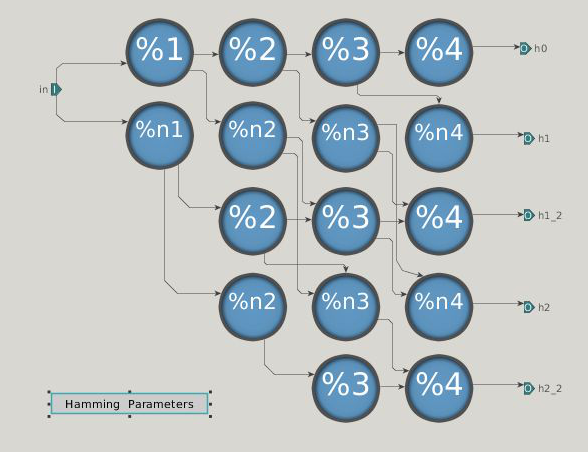
Create the following design:
-
The small boxes are ports, which we will use to connect macros
-
The symbols on the STEs allow us to set parameters (fill in the actual values later)
-
-
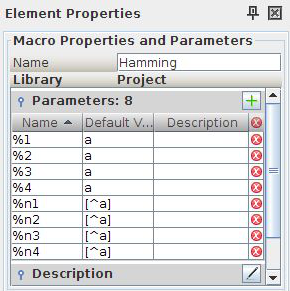
Select 'Hamming Parameters'
-
In the element properties pane, add the following parameters:
-
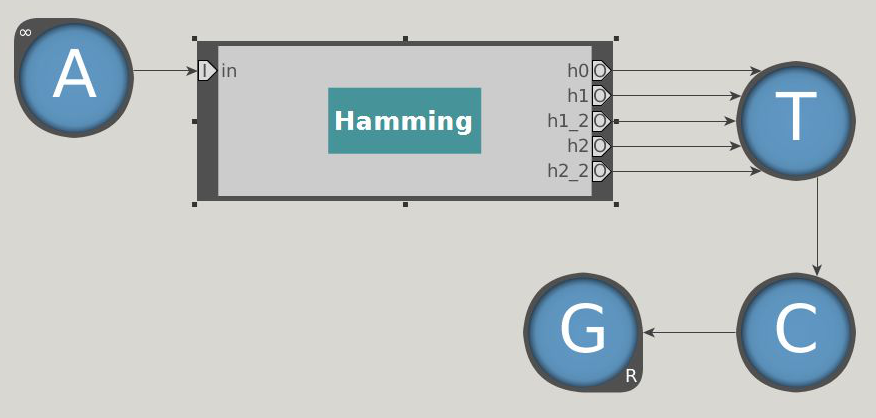
Back in the main project tab, create the following design:
-
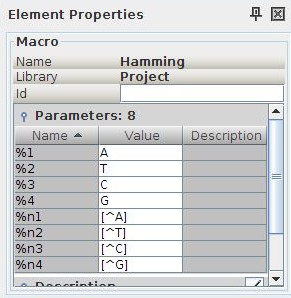
In the element properties pane, set the following parameters for the Hamming macro:
-
Simulate using the following text:
AATCGTCGAGGCGTCG
Double-click on the macro to view simulation inside the macro
Validating and Optimizing
Some designs will not run efficiently on the AP. Often, this will occur
when there are chains of boolean elements. Consider the example in the
verify project.
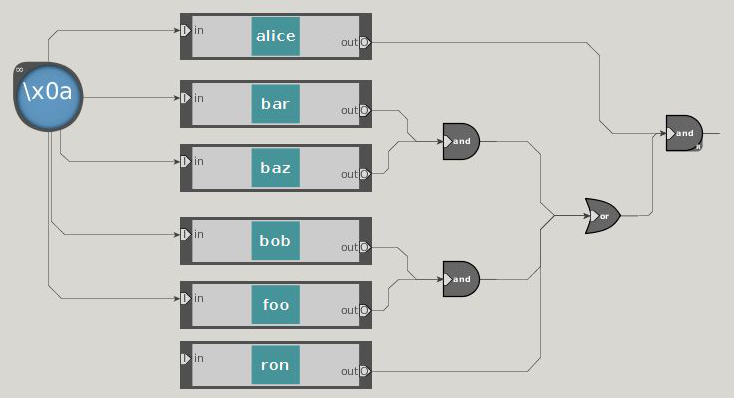
The chaining of the boolean elements will result in the clock cycle of the AP being reduced to accommodate signal propagation. Here is an alternate design that will not have this problem:
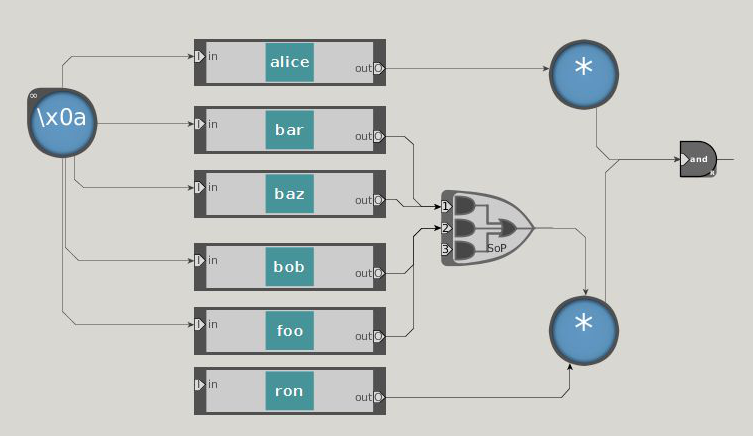
By placing the additional STEs between the logic, we can run the AP at full clock speed. The only drawback is that the report will come one cycle after we expect, but this is easy to account for in post-processing!
Programmatically Generating Automata
Programming with the Workbench can quickly become tedious as designs grow in size. The SDK also provides programming language bindings to help generate automata. We will use Python bindings in this tutorial.
Example 1: PCRE to ANML
import argparse, os
from micronap.sdk import *

def main():
    parser = argparse.ArgumentParser()
    parser.add_argument("pcre_file", help="the pcre file")
    parser.add_argument("outfile", help="the anml file")

    args = parser.parse_args()

    # strip the name
    name = os.path.splitext(os.path.split(args.outfile)[1])[0]

    # make the ANML workspace
    A = Anml()
    AN = A.CreateAutomataNetwork(anmlId=name)

    # open the regex file
    f = open(args.pcre_file, 'r')
    regex = f.readlines()
    f.close

    #use this to keep track of the pcre rule
    i = 0
    for r in regex:
        i += 1
        id = "_" + str(i)

        # get rid of whitespace
        r = r.strip()

        try:
            AN.AddRegex(r,
                        startType=AnmlDefs.ALL_INPUT,
                        reportCode=i,
                        anmlId=id,
                        match=True
                        )
        except ApError as e:
            print "error:", e, r

    AN.ExportAnml(args.outfile)

if __name__ == '__main__':
    main()
Example 2: Generating Hamming Distance Macro
from micronap.sdk import *

def main():
    A = Anml()
    M = A.CreateMacroDef(anmlId='hamming')

    # the number of mismatches
    d = 3

    # length of string to compare against
    string_length = 7

    ste_list = dict()

    #set up param ste lists
    positive_param = []
    negative_param = []

    for i in range(string_length):
        positive_param.append([])
        negative_param.append([])

    # generate automata structure
    for i in range(2*d+1):
        for j in range(i/2,string_length):
            ste_id = '_'+str(i)+'_'+str(j)

            # set default values
            # we will replace these when instantiating
            if i%2 == 0:
                pattern = 'a'
            else:
                pattern = '[^a]'

            # starting states
            if j == 0:
                start = AnmlDefs.ALL_INPUT
            else:
                start = AnmlDefs.NO_START

            # if we reach the end, report
            if j == string_length-1:
                report = True
            else:
                report = False

            ste_list[ste_id] = M.AddSTE(pattern,anmlId=ste_id,startType=start,match=report)

            # connect sequences of matching characters
            if i%2 == 0 and j>i/2:
                old_id = '_'+str(i)+'_'+str(j-1)
                M.AddAnmlEdge(ste_list[old_id], ste_list[ste_id])

            # diagonal mismatch transitions
            if i>0 and j>(i-1)/2:
                old_id = '_'+str(i-1)+'_'+str(j-1)
                M.AddAnmlEdge(ste_list[old_id], ste_list[ste_id])

            # two mismatches in a row
            if i>1 and i%2 == 1:
                old_id = '_'+str(i-2)+'_'+str(j-1)
                M.AddAnmlEdge(ste_list[old_id], ste_list[ste_id])

            # add ste to parameter list
            if i%2 == 0:
                positive_param[j].append(ste_list[ste_id])
            else:
                negative_param[j].append(ste_list[ste_id])

    # set parameter information
    for i in range(string_length):
        M.AddMacroParam(paramName='%'+str(i+1),elementRefs=positive_param[i])
        M.AddMacroParam(paramName='%n'+str(i+1),elementRefs=negative_param[i])

    M.ExportAnml('hamming'+str(string_length)+'_'+str(d)+'.anml')

if __name__ == '__main__':
    main()
Example 3: Stamp out a Macro
from micronap.sdk import *

def main():
    # create workspace
    A = Anml()
    AN = A.CreateAutomataNetwork(anmlId='hamming_reads')

    # load the macro
    hamming = A.LoadAnmlMacro('hamming7_3.anml')

    # read in the DNA sequences
    f = open ('reads.txt', 'r')
    reads = f.readlines()
    f.close()

    for r in reads:
        r = r.strip()
        k = AN.AddMacroRef(hamming,anmlId=r)
        for i in range(len(r)):

            # get a handle to the parameter
            ref = hamming.GetMacroParamFromName('%'+str(i+1))

            # get a handle to sub the parameter
            sub = hamming.GetMacroParamSubstitutionHolder(ref)

            # set the value
            sub.ste.new_symbols = r[i]

            # write this out
            AN.SetMacroParamSubstitution(k,sub)

            # do the same for negation

            # get a handle to the parameter
            ref = hamming.GetMacroParamFromName('%n'+str(i+1))

            # get a handle to sub the parameter
            sub = hamming.GetMacroParamSubstitutionHolder(ref)

            # set the value
            sub.ste.new_symbols = "[^" + r[i] + "]"

            # write this out
            AN.SetMacroParamSubstitution(k,sub)

    # write out the file
    AN.ExportAnml('hamming_reads.anml')

if __name__ == '__main__':
    main()
Compiling ANML
The final step is to compile the generated ANML file into a format that
can be run on the AP. This is very similar to compiling for PCRE. We
use the additional -A flag to specify that ANML is being
compiled and to provide a file name for the element map. This stores
STE ID information for reconstruction of report events.
apcompile -Abrill.emap -f brill.fsm brill.anml
Compiling in verbose mode provides information about the final design statistics. This can be helpful for estimating space utilization on the AP. The important numbers are STE Utilization and Total Rectangular Blocks.
apcompile -v -Abrill.emap -f brill.fsm brill.anml
To speed things up, we can also turn on multi-threading in the compiler.
apcompile -v -MT -Abrill.emap -f brill.fsm brill.anml
Macros can also be pre-compiled. This allows for faster compilation of the final design.
apcompile -v -MT -A -f hamming7_3.fsm hamming7_3.anml
Simulation and Emulation
ANML files can be simulated using batchSim:
batchSim -v brill.anml brill_input.txt
Compiled designs can be emulated using apemulate:
apemulate -m brill.emap brill.fsm brill_input.txt
References
AP Portal. Accessed 2016-03-03. http://micronautomata.com
AP Programmers Reference. Accessed 2016-03-03. http://micronautomata.com/apsdk_documentation/latest/index.html
Brill: Trainable Part of Speech Tagger. Accessed 2016-03-03. https://www.cs.cmu.edu/Groups/AI/areas/nlp/parsing/taggers/brill/0.html
Doughnut. Accessed 2016-03-03. https://en.wikipedia.org/wiki/Doughnut
Linux® SDK Activation. Accessed 2016-03-03. http://micronautomata.com/apsdk_documentation/latest/h1_sdk.html#h3_sdk_activation_linux
I. Roy and S. Aluru. Finding Motifs in Biological Sequences Using the Micron Automata Processor. In Proceedings of the 28th IEEE International Parallel and Distributed Processing Symposium, pages 415–424, 2014.
Last modified: 2016-03-04