Repairing Faults in ArduPilot
Custom Repair Flight Mode
Kevin Angstadt
angstadt@umich.edu
University of Michigan
Introduction
This tutorial describes the process of creating a custom flight mode in the APM:Copter (ArduCopter) software stack. We will use this flight mode to make repairs to the software stack in flight. This tutorial demonstrates functionality using a manual flight mode yaw fault on the 3D Robotics Iris+ multicopter.
For background reading on building the software stack for the Iris+, simulating the flight stack, and the injected fault, please see Injecting and Testing Faults in ArduPilot. This tutorial assumes that the reader is familiar with these concepts.
A multicopter is not required to conduct the SITL simulation (only a joystick is required). Simply skip the Triggering
Repair Mode and Test the Flight Mode sections. You do not need to issue any
make commands; these are handled by the shell script for SITL.
These instructions have been tested with Ubuntu 14.04 x64 using ArduCopter 3.3.
Acquire Software
The custom flight mode is contained in a separate branch of a fork of the ArduPilot repository. If you are using a fresh machine, be sure to install dependencies and configure settings before proceeding. General instructions may be found here (replace the repository with the one listed below).
-
Clone the repository:
git clone https://bitbucket.org/kevinaangstadt/ardupilot.git
-
Checkout the
Copter-Bugfixbranch:cd ardupilot
git checkout Copter-Bugfix -
ArduCopter can now be built as per usual:
cd ArduCopter
make px4-v2-quad -
Flash the Iris+ with this new firmware.
Exploring the Flight Mode
Let's look at the files that were created and modified to implement the repair mode.
Yaw Bug
While the notion of the bug is the same as in this tutorial, the implementation is
slightly different. First, we use a variable to keep track of the state of the bug. The variable is declared in line 129 of ArduCopter/Copter.h.
We will also need an additional variable for the repair mode, which is declared on the following line.
//bug variable controller
bool demonstrate_bug;
int bug_count;
The variable is initialized to be true on line 158 of ArduCopter/Arducopter.cpp.
void Copter::setup()
{
    //turn the bug on to start
    demonstrate_bug = true;
...
The code then checks this variable before simulated in the bug in lines 45-50 of ArduCopter/Attitude.cpp. We simulate a repair by changing
the value of this variable.
float Copter::get_pilot_desired_yaw_rate(int16_t stick_angle)
{
    // convert pilot input to the desired yaw rate
    if (demonstrate_bug) {
        return abs(stick_angle * g.acro_yaw_p);
    } else {
        return stick_angle * g.acro_yaw_p;
    }
}
Repair Flight Mode
A custom flight mode requires two functions, which are defined in ArduCopter/Copter.h on lines 757-759.
//flight mode for repair
bool repair_init(bool ignore_checks);
void repair_run();
Next, the flight mode must be declared as a valid mode and switch option. This is achieved by adding entries to the autopilot_modes
and aux_sw_func enumerations found in ArduCopter/defines.h (lines 69 and 106).
// Auto Pilot Modes enumeration
enum autopilot_modes {
    STABILIZE =     0,  // manual airframe angle with manual throttle
    ACRO =          1,  // manual body-frame angular rate with manual throttle
    ALT_HOLD =      2,  // manual airframe angle with automatic throttle
    AUTO =          3,  // fully automatic waypoint control using mission commands
    GUIDED =        4,  // fully automatic fly to coordinate or fly at velocity/direction using GCS immediate commands
    LOITER =        5,  // automatic horizontal acceleration with automatic throttle
    RTL =           6,  // automatic return to launching point
    CIRCLE =        7,  // automatic circular flight with automatic throttle
    LAND =          9,  // automatic landing with horizontal position control
    OF_LOITER =    10,  // deprecated
    DRIFT =        11,  // semi-automous position, yaw and throttle control
    SPORT =        13,  // manual earth-frame angular rate control with manual throttle
    FLIP =         14,  // automatically flip the vehicle on the roll axis
    AUTOTUNE =     15,  // automatically tune the vehicle's roll and pitch gains
    POSHOLD =      16,  // automatic position hold with manual override, with automatic throttle
    BRAKE =        17,  // full-brake using inertial/GPS system, no pilot input
    REPAIR=        18   // GenProg Flight Mode, based off of brake
};
// Aux Switch enumeration
enum aux_sw_func {
    AUXSW_DO_NOTHING =           0, // aux switch disabled
    AUXSW_FLIP =                 2, // flip
    AUXSW_SIMPLE_MODE =          3, // change to simple mode
    AUXSW_RTL =                  4, // change to RTL flight mode
    AUXSW_SAVE_TRIM =            5, // save current position as level
    AUXSW_SAVE_WP =              7, // save mission waypoint or RTL if in auto mode
    AUXSW_CAMERA_TRIGGER =       9, // trigger camera servo or relay
    AUXSW_SONAR =               10, // allow enabling or disabling sonar in flight which helps avoid surface tracking when you are far above the ground
    AUXSW_FENCE =               11, // allow enabling or disabling fence in flight
    AUXSW_RESETTOARMEDYAW =     12, // changes yaw to be same as when quad was armed
    AUXSW_SUPERSIMPLE_MODE =    13, // change to simple mode in middle, super simple at top
    AUXSW_ACRO_TRAINER =        14, // low = disabled, middle = leveled, high = leveled and limited
    AUXSW_SPRAYER =             15, // enable/disable the crop sprayer
    AUXSW_AUTO =                16, // change to auto flight mode
    AUXSW_AUTOTUNE =            17, // auto tune
    AUXSW_LAND =                18, // change to LAND flight mode
    AUXSW_EPM =                 19, // Operate the EPM cargo gripper low=off, middle=neutral, high=on
    AUXSW_PARACHUTE_ENABLE  =   21, // Parachute enable/disable
    AUXSW_PARACHUTE_RELEASE =   22, // Parachute release
    AUXSW_PARACHUTE_3POS =      23, // Parachute disable, enable, release with 3 position switch
    AUXSW_MISSION_RESET =       24, // Reset auto mission to start from first command
    AUXSW_ATTCON_FEEDFWD =      25, // enable/disable the roll and pitch rate feed forward
    AUXSW_ATTCON_ACCEL_LIM =    26, // enable/disable the roll, pitch and yaw accel limiting
    AUXSW_RETRACT_MOUNT =       27, // Retract Mount
    AUXSW_RELAY =               28, // Relay pin on/off (only supports first relay)
    AUXSW_LANDING_GEAR =        29, // Landing gear controller
    AUXSW_LOST_COPTER_SOUND =   30, // Play lost copter sound
    AUXSW_MOTOR_ESTOP =         31, // Emergency Stop Switch
    AUXSW_MOTOR_INTERLOCK =     32, // Motor On/Off switch
    AUXSW_BRAKE =               33, // Brake flight mode
    AUXSW_REPAIR =              34  // GenProg style-repair flight mode
};
The flight mode functions are defined in ArduCopter/control_repair.cpp. This file was originally copied from ArduCopter/control_brake.cpp,
which attempts to stop the quadcopter from moving as quickly as possible and then ignore user control input. (Comments in the code still refer to the brake mode).
The highlighted portions below were added to simulate repairing the bug. Note that repair_init is called when switching into the flight mode. Here,
the code initializes a counter to 0. While in the repair mode, repair_init is called 100 times a second. The code counts to 400 (four seconds) and then
negates the value of the bug variable.
#include "Copter.h"

/*
 * control_brake.pde - init and run calls for brake flight mode
 */

// brake_init - initialise brake controller
bool Copter::repair_init(bool ignore_checks)
{
    if (position_ok() || optflow_position_ok() || ignore_checks) {

        // set desired acceleration to zero
        wp_nav.clear_pilot_desired_acceleration();

        // set target to current position
        wp_nav.init_brake_target(BRAKE_MODE_DECEL_RATE);

        // initialize vertical speed and acceleration
        pos_control.set_speed_z(BRAKE_MODE_SPEED_Z, BRAKE_MODE_SPEED_Z);
        pos_control.set_accel_z(BRAKE_MODE_DECEL_RATE);

        // initialise altitude target to stopping point
        pos_control.set_target_to_stopping_point_z();

        bug_count = 0;

        return true;
    }else{
        return false;
    }
}

// brake_run - runs the brake controller
// should be called at 100hz or more
void Copter::repair_run()
{
    // if not auto armed set throttle to zero and exit immediately
    if(!ap.auto_armed) {
        wp_nav.init_brake_target(BRAKE_MODE_DECEL_RATE);
#if FRAME_CONFIG == HELI_FRAME  // Helicopters always stabilize roll/pitch/yaw
        // call attitude controller
        attitude_control.angle_ef_roll_pitch_rate_ef_yaw_smooth(0, 0, 0, get_smoothing_gain());
        attitude_control.set_throttle_out(0,false,g.throttle_filt);
#else   // multicopters do not stabilize roll/pitch/yaw when disarmed
        attitude_control.set_throttle_out_unstabilized(0,true,g.throttle_filt);
#endif
        pos_control.relax_alt_hold_controllers(get_throttle_pre_takeoff(0)-throttle_average);
        return;
    }

    // relax stop target if we might be landed
    if (ap.land_complete_maybe) {
        wp_nav.loiter_soften_for_landing();
    }

    // if landed immediately disarm
    if (ap.land_complete) {
        init_disarm_motors();
    }

    if (bug_count <= 400) {
        bug_count++;
    }

    if (bug_count == 400) {
        demonstrate_bug = !demonstrate_bug;
    }

    // run brake controller
    wp_nav.update_brake(ekfGndSpdLimit, ekfNavVelGainScaler);

    // call attitude controller
    attitude_control.angle_ef_roll_pitch_rate_ef_yaw(wp_nav.get_roll(), wp_nav.get_pitch(), 0.0f);

    // body-frame rate controller is run directly from 100hz loop

    // update altitude target and call position controller
    pos_control.set_alt_target_from_climb_rate(0.0f, G_Dt, false);
    pos_control.update_z_controller();
}
To support switching into the repair flight mode, ArduCopter/flight_mode.cpp must be modified. First, we add to the switch statement for
initializing flight modes (lines 98-100).
case REPAIR:
    success = repair_init(ignore_checks);
    break;
Then, we add to the switch statement for updating the flight mode during flight (lines 214-216).
case REPAIR:
    repair_run();
    break;
Finally, we add to the switch statement for printing the flight mode to the serial port (lines 372-274):
case REPAIR:
    port->print_P(PSTR("REPAIR"));
    break;
To support using an RC switch to enable the repair flight mode, we modify ArduCopter/switches.cpp on lines 590-599.
case AUXSW_REPAIR:
    // repair flight mode
    if (ch_flag == AUX_SWITCH_HIGH) {
        set_mode(REPAIR);
    } else {
        // return to flight mode switch's flight mode if we are currently in REPAIR
        if (control_mode == REPAIR) {
            reset_control_switch();
        }
    }
Triggering Repair Mode
To trigger the repair flight mode, we will use channel 8 on the RC controller. By default, this channel is unused by the Iris+.
Configure the RC Controller
-
Turn on the RC controller for the Iris+
-
Press and hold the MENU button. Then, press the - button four times to get to menu 5/10 "Mixer".
-
Press DN twelve times to highlight 100 next to CH7.
-
Press and release MENU to highlight the row.
-
Press DN three times to copy the entry to CH8. Press MENU to confirm the copy.
-
Press and hold MENU to enter the Edit Mix menu.
-
Press DN six times to highlight ELE.
-
Press MENU so that the background is flashing.
-
Press + twice so that the entry is now THR.
-
Pres MENU to confirm.
-
Press EXIT to return to the previous menu.
-
Press UP once to highlight -100 one line below CH7.
-
Press and release MENU to highlight the row.
-
Press DN three times to copy the entry to one line below CH8. Press MENU to confirm the copy.
-
Press and hold MENU to enter the Edit Mix menu.
-
Press DN six times to highlight ELE.
-
Press MENU so that the background is flashing.
-
Press - twice so that the entry is now THR.
-
Pres MENU to confirm.
-
Press EXIT to return to the previous menu.
-
Press EXIT again to finish editing the Mixer menu.
-
Press EXIT a final time to return to the main menu screen.
Set Behavior of Channel 8
-
Connect the Iris+ using APM Planner.
-
Choose the CONFIG/TUNING tab. Select Full Parameter List from the left side menu.
-
Search for CH8_OPT. Set the value to 34 (this corresponds to the value of Repair Mode in the
aw_sw_funcenumeration).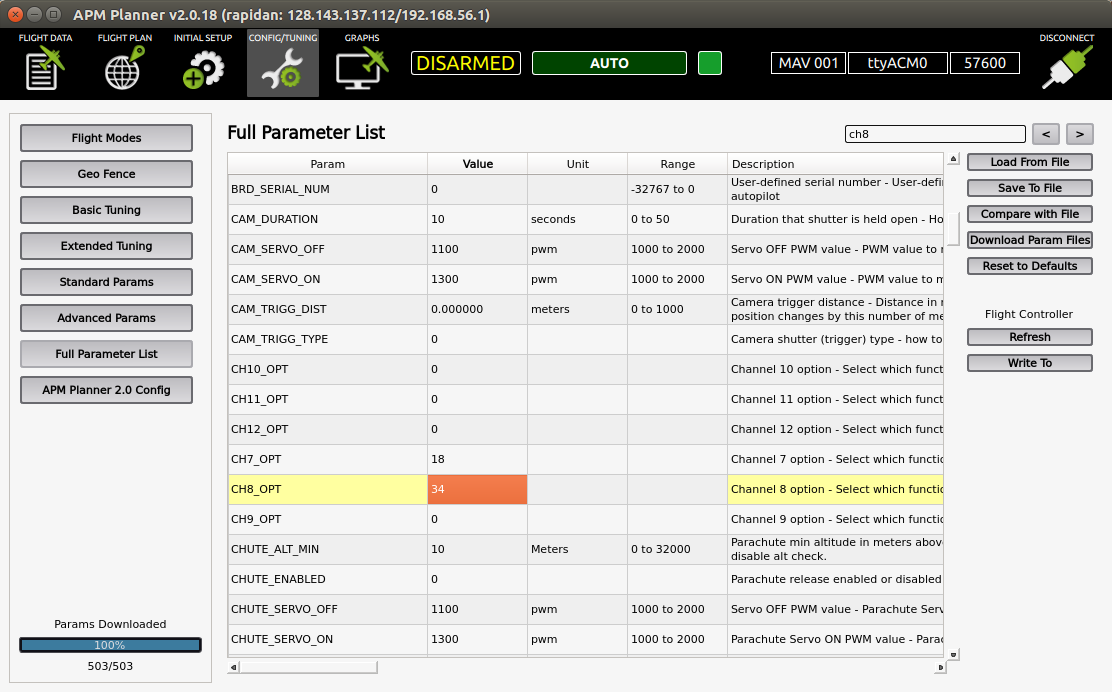
-
Write the new parameter to the Iris+. (Optionally, also back up the parameters for easy recovery)
-
Flip the "Throttle Cut" switch on the controller (the big switch on the back left). This will enable Repair mode. Repair mode shows up in APM Planner as MODE(18). We will now call this the Repair Mode switch.
Test the Flight Mode
-
Take off in either Alt-Hold or Loiter mode.
-
Move the yaw stick to the right. The Iris+ will rotate clockwise.
-
Move the yaw stick to the left. The Iris+ will rotate clockwise (this is the bug).
-
Flip the Repair Mode switch.
-
Try to move the control sticks. They should not have any effect.
-
Flip the Repair Mode switch again.
-
Move the yaw stick to the right. The Iris+ will rotate clockwise.
-
Move the yaw stick to the left. The Iris+ will rotate counter-clockwise. The bug has been repaired.
-
Land the quadcopter.
Observing Fault Using Software in the Loop (SITL) Simulation
To observe a fault in manual flight modes using the software simulators, you will need a USB joystick. This tutorial uses the Logitech Extreme 3D Pro Joystick.
n.b. This simulation requires a fair bit of screen real estate; be prepared to work with four windows at once. Dual monitors are not required, but definitely helpful.
-
Connect the joystick via USB
-
Change into the
ArduCopterdirectory:cd ardupilot/ArduCopter
-
The first time you run SITL, wipe the virtual EEPROM:
sim_vehicle.sh -w
-
This will print out several log messages. Once you see the following, quit the simulation with
^c:STABILIZE> APM: APM:Copter V3.3.1 (792e989c)
APM: Frame: QUAD
Received 528 parameters
Saved 528 parameters to mav.parm
fence breach
GPS lock at 0 meters -
Launch the simulation:
sim_vehicle.sh --console --map --quad
-
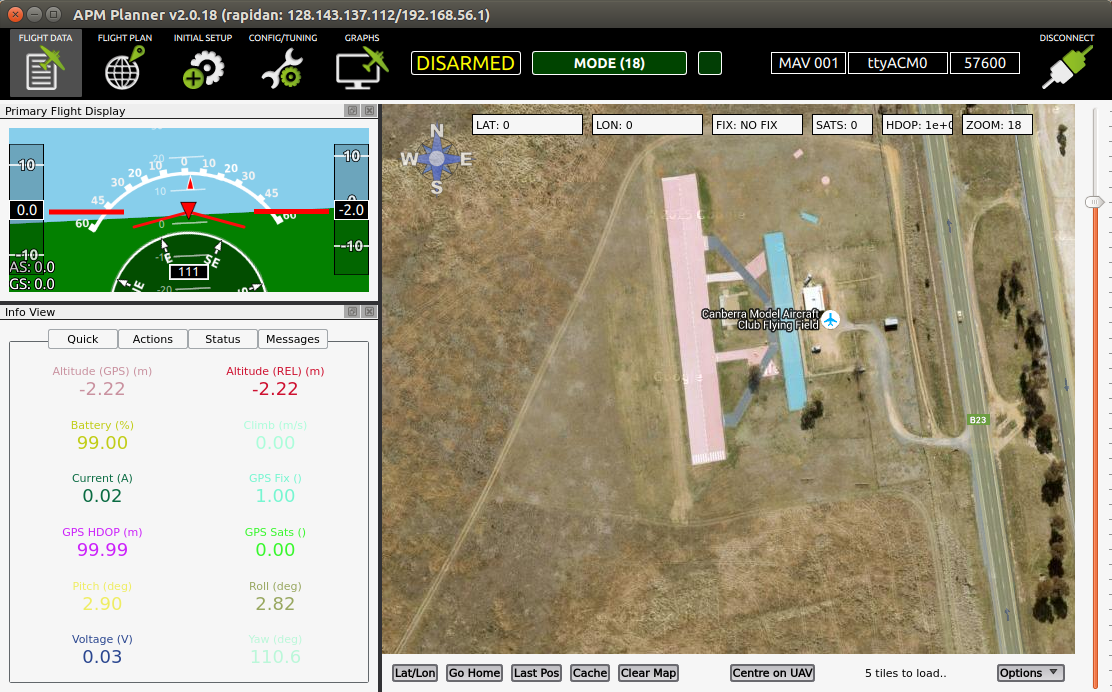
Launch APM Planner 2. The software should automatically connect to the simulator (You should see non-zero values in the info pane). If not:
-
Ensure File -> Advanced Mode is checked
-
Communication -> UDP Link (port:14550) Settings
-
Click Connect
-
If you do not see non-zero values now, restart APM Planner 2
-
-
You now have four windows open and be located at the Canberra Model Aircraft Club Flying Field. Windows are labelled below to unify terminology:

-
Configure APM Planner 2 to use the Joystick:
-
File -> Joystick
-
If you are using the Logitech joystick, set the axes as follows:
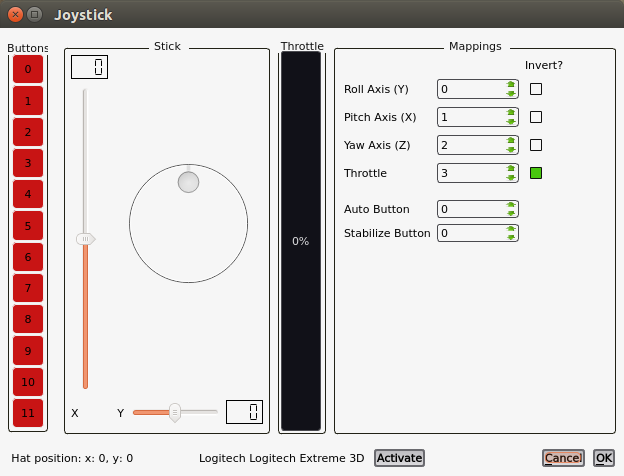
Other joysticks may have different channels/reversal mappings for desired functionality.
-
Click
Activateand thenOK.
-
-
Initiate flight using the terminal:
mode loiter
arm throttle -
Increase throttle on joystick to just above half-way point. You should see the quadcopter take off and the altitude increase in the Info pane of APM Planner 2. Move the throttle to the half-way point to maintain altitude.
Note: If you do not perform this step quickly after arming the motors (
arm throttle), the motors will disarm. You can see the status at the top of APM Planner 2. If the motors disarm, simply repeat the command to arm in the terminal. -
Twist the joystick to the right. You should see the quadcopter turn clockwise on the map.
-
To observe the bug, twist the joystick to the left. You should still see the quadcopter turn clockwise on the map. (We would expect the quadcopter to rotate counter-clockwise without the bug.)
-
Switch into repair mode using the terminal:
mode 18
-
The joystick should now not have any control over the simulation.
-
After five seconds, switch back into loiter mode:
mode loiter
-
To observe the repair, twist the joystick to the right. You should see the quadcopter turn clockwise on the map. Twist the joystick to the left. You should now see the quadcopter rotate counter-clockwise on the map.
-
To land, type the following into the terminal:
mode land
-
Close out of APM Planner 2 and terminate the simulation by pressing
^cin the terminal.
References
Adding a New Flight Mode (Copter Code Overview). Accessed 2015-12-22. http://dev.ardupilot.com/wiki/apmcopter-adding-a-new-flight-mode
Building ArduPilot for Pixhawk/PX4 on Linux with Make. Accessed 2015-11-04. http://dev.ardupilot.com/wiki/building-px4-for-linux-with-make
How to Configure a Switch for CH8 on the Iris Quad. Accessed 2015-12-22. http://www.communistech.com/how-to-configure-a-switch-for-ch8-on-the-iris-quad
Setting up SITL on Linux. Accessed 2015-11-04. http://dev.ardupilot.com/wiki/setting-up-sitl-on-linux
Last modified: 2015-12-22